


Building a 18650 battery pack lets you create a customized power source for projects, while saving money compared to buying pre-built battery packs. But to build a safe, high-performance pack takes knowledge and care.
In this ultimate guide, as a professional 18650 battery pack manufacturer, I’ll walk through everything required to DIY a 18650 battery pack step-by-step. You’ll become an expert on these lithium-ion wonders!
Why Choose 18650 Batteries?
18650 refers to the size of these cylindrical cells – they’re 18mm wide and 65mm tall. This makes them a bit larger than common AA batteries.
Within this form factor though lies tremendous versatility. Compared to AA cells, 18650s offer:
- Higher voltages – typically from 3.6 to 3.7 volts. This reduces the number of cells needed in series.
- Lower internal resistance – so less cells needed for a given current draw.
- Far higher energy density – storing roughly 3x the power of AA alkalines.
With the right protection circuitry, 18650 cells can be configured into battery packs for everything from laptops, ebikes, even electric cars! And their mass production makes these cells very affordable.
For the DIY builder or tinkerer, 18650 cells are a gateway to creating custom energy solutions.
Parts of a 18650 Battery Pack
To build a safe 18650 pack takes more than just a heap of cells stuffed in a case. Several components work together to make these batteries practical and usable:
18650 Cells – High quality name brand cells from the likes of Panasonic, Samsung, or LG. Avoid no-name cells.
Nickel Strips – Pure nickel strips, not steel, join the cells together electrically. 0.15mm thickness is common.
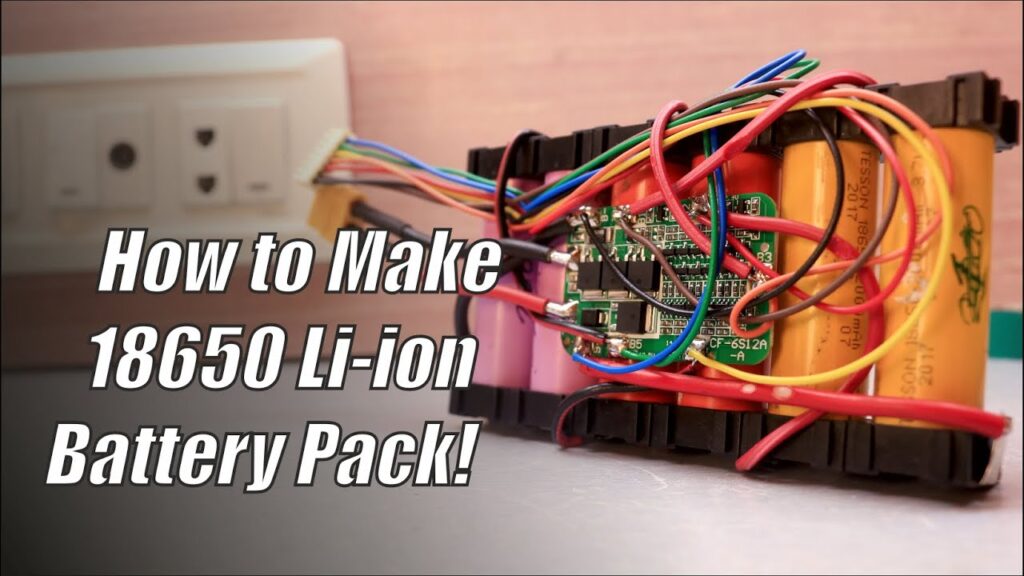
Battery Management System (BMS) – The BMS is the brains keeping cells balanced and preventing overcharge or over-discharge.
Cell Holders – Plastic cell holders align cells neatly and provide ventilation space for cooling.
Enclosure – Houses cells, BMS, and peripherals while insulating them electrically. 3D printing is one option.
Wire Terminals & Switches – Wires connect cells to devices being powered, with switches controlling connectivity.
Combined intelligently, these parts enable DIYers to create custom lithium ion batteries cheaper than commercial packs, while enabling configurations commercial packs don’t offer.
How to Make a 18650 Battery Pack?
Step 1 – Determining Pack Configuration
With loose cells, the first step is deciding the pack’s shape – how many parallel groups of cells, and how many cells in series in each group. This sets overall voltage and capacity.
Series Configuration
Series connections add cell voltages. 18650 nominal voltage is 3.6-3.7V.
For 12V, connect 3 cells in series (3 x 3.7V = 11.1V). 4 cells for 14.8V, 5 cells for 18.5V, etc. This single series “string” is 1S.
Parallel Configuration
Parallel connections add cell capacities (mAh). If one cell is 2500mAh, two 2500mAh cells in parallel makes a 5000mAh group.
Our 12V pack needs 100Ah (amp-hours), and using 3.4Ah cells, 100Ah / 3.4Ah = 30 parallel groups. This is 30P.
Together in series and parallel gives the pack shape – for a 12V 100Ah pack using 3.4Ah cells, it’s 3S30P. 90 cells total.
Online “pack planner” tools simplify these calculations. They ensure you buy enough cells and parts too.
Step 2 – Selecting Quality 18650 Cells
With shape decided, it’s time to buy cells. Used laptop cells can work if their condition is verified. For reliability though, new cells from quality brands are worth it.
Check seller datasheets for cell specs, confirming capacity, max discharge rate, etc. Compare brand options before deciding which 18650 cell to standardize on.
Store cells safely while awaiting pack assembly, leaving in packaging and avoiding metal contact. A plastic ammo case is one inexpensive storage option.
Step 3 – Welding Cells with Nickel Strip
To join cells electrically, pure nickel strip is superior to steel. 0.15mm thickness is common.
Parallel Welds – Lay a strip atop cells, positioned to contact all positive or negative terminals when welded. A lead hangs off for BMS wiring. Repeat strips for all groups.
Series Welds – Small strips weld between cell groups, alternating positive an negative terminals for series voltage rise.
A quality spot welder (not soldering iron!) ensures reliable, low resistance connections. Practice first if new to welding. Work carefully – cell damage can be dangerous.
Step 4 – Configuring Protection with a BMS
A battery management system (BMS) is mandatory for safe lithium-ion packs. The BMS:
- Monitors group voltages during charge/discharge
- Balances uneven group voltages
- Prevents over-voltage charging or over-discharge
Select a BMS matching pack voltage and max continuous discharge current. Allow some overhead if load current might spike.
Screw terminals make for clean BMS wiring versus soldering. Cell “balance leads” attach between groups to enable voltage monitoring.
Step 5 – Securing Cells and BMS
With electricals connected, securing the pack physically leads to reliable performance long-term.
Plastic cell holders provide a neat way to align and space cells, locking them firmly in place layer by layer like bricks. This improves cooling while protecting cells in drops or crashes.
Alternatively for rigid packs, hot melt glue guns quickly adhere cells. Some builders use layup fiberglass around the pack for hard enclosures. Silicone sealant helps too.
The BMS meanwhile mounts atop the pack or beside it within the enclosure if space allows. This protects delicate circuit boards from vibration or shocks.
Step 6 – Insulation, Wiring, and Enclosure
Nearly complete! Enclosures now insulate the battery, while switches and wiring offer in/out connectivity.
Insulation – Kapton tape, fish paper, even paper towel provide simple and effective insulation against accidental cell shorts.
Wiring – Appropriate gauge wire runs from BMS terminals to DC jacks, switches, etc. based on expected load current. Add inline fuses too for safety!
Enclosures – A custom enclosure is satisfying to make or 3D print for one’s pack. Cell trays provide access inside hard case enclosures from drone/RC suppliers.
Be sure to size wiring, switches, jacks etc. appropriately for load current, and insulate fully before sealing up!
Step 7 – Initial Testing, Balancing, and Charging
Before connecting your new battery pack to important gear – test it!
Check cell group voltages with a quality multimeter. Groups should be very close (within a couple millivolts) if matched well and freshly assembled.
If groups show more variance – immediately stop and investigate cell differences or connection issues.
Ideally though slight differences will self-balance in initial gentle charge cycles. Use a proper Li-ion charger respecting pack/cell limits…The BMS won’t let you overcharge once connected.
Powering Your Projects with 18650 Battery Pack!
With smart construction and appropriate safeguards in place, your custom lithium-ion pack will deliver years of service. Modifying loose cells into a battery enables building energy solutions exactly for your needs.
Use quality name brand 18650 cells and parts, take assembly step by step, and test thoroughly…and your battery will perform beautifully!
Whether powering an Arduino project, ebiking across town, smoothing a solar setup – your DIY 18650 pack makes it possible. Building battery know-how proves very handy too as our world shifts electric.
To help with the details for your project, check my other DIY battery guides covering pack planning, parts sourcing, construction options and more. Let me know too if any questions come up – happy building!