


Multimeters are versatile tools that allow us to check key parameters and determine battery health. But do you know how to effectively check 18650 lithium-ion battery with a multimeter?
In this step-by-step guide, as a professional 18650 battery packs manufacturer, I’ll walk you through the complete process to accurately test 18650 battery with a multimeter.
Key Takeaways
- A multimeter can check 18650 battery voltage and internal resistance to assess health.
- Healthy voltage typically ranges from 3.6 V to 4.2 V, with low internal resistance under 100 mΩ.
- Abnormal, unstable, or consistently low readings signal degradation or safety concerns.
- Regular testing helps prevent failures and supports timely battery replacement decisions.
Why Check 18650 Battery Health?
In laptops, electric vehicles, high-drain electronics, 18650 lithium-ion batteries provide reliable power. However, improper use, aging or defects can degrade the battery, affecting runtime, performance, and even safety.
That’s why assessing 18650 battery health through key tests is crucial. Preemptively spotting issues allows us to:
- Maximize performance and prevent premature failures
- Identify and isolate faulty cells
- Practice caution with worn cells to mitigate risks
- Determine reuse or timely replacement
Simply put, multimeter-based 18650 battery checks give the data needed to optimize usage.
How to Check 18650 Battery with Multimeter?
How to Check 18650 Battery Voltage
The open circuit voltage test gauges a cell’s state of charge and stability. Here’s how to perform it:
We’ll need:
- 18650 battery
- Digital multimeter
Step 1: Let the 18650 Battery Rest
If the cell was in use, let it stabilize for a few hours first. This allows voltage to normalize absent any load.
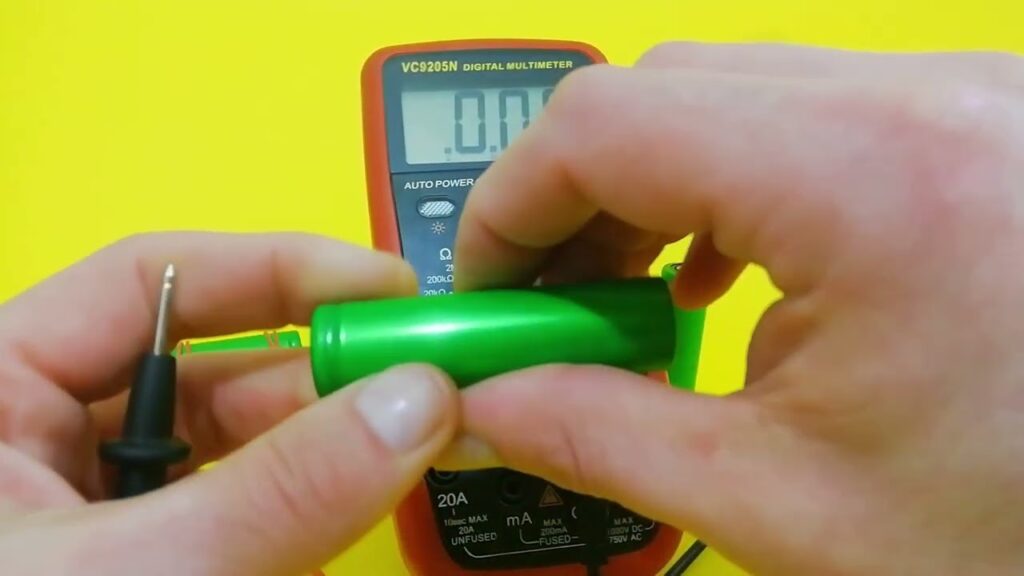
Step 2: Set Multimeter to Voltage Measurement
Turn the dial to “DC Voltage” generally denoted by a V with straight lines. 20V or 10V range will work for most 18650 Li-ion cells.
Step 3: Connect Probes to Battery
Touch the red (positive) and black (negative) multimeter leads to the 18650 battery terminals. Note: mind the polarity; accidental reverse connection for lithium-ion cells is unsafe.
Step 4: Read Voltage
A healthy and fully charged 18650 will show around 4.2V open circuit. Anything between 3.6V to 4.2V is good. Below 3.6V indicates partial charge and below 3.2V is fully discharged.
Deviations from this range merit a closer inspection for cell degradation. Repeated abnormal voltage readings especially point to 18650 battery issues.
How to 18650 Battery Internal Resistance
The battery’s internal resistance (IR) is another vital health parameter. Using the appropriate multimeter resistance mode:
Step 1: Turn Dial to Ohms Setting
For most digital multimeters it’s denoted by the Ω symbol. Select a value just over what you expect the IR measurement to be. 10 Ω or 20 Ω range is usually suitable.
Step 2: Connect Probes to Battery
As always take care to match polarity when making connections. Complete the circuit by having both multimeter probes in contact.
Step 3: Note Internal Resistance Reading
A healthy 18650 battery will exhibit very low IR – under 100 milliohms. As batteries age, IR creeps up. Look for consistency in readings as unusually high or fluctuating values demand attention.
That covers the fundamentals, but for enhanced precision consider dedicated 18650 battery analyzers. Available discharge and continuity modes make diagnosis more exact.
Multimeter 18650 Battery Testing Tips
To leverage your multimeter’s versatility fully while testing 18650 cells:
- Utilize Reference Points: Maintain a record of battery parameters when new. Comparing current vs initial readings accurately determines degradation.
- Test Under Load: Check both no load and loaded voltages for better insights. Load can simply be a matching resistor.
- Identify Weak Cells: Test batteries in batches to detect outliers with abnormal readings indicating issues.
- Consider Temperature: Hotter/colder weather may slightly impact readings. Account for this while interpreting cell voltage and resistance.
- Check Continuity: Use continuity mode to uncover internal shorts and check welds in battery packs.
FAQs
How often should I test 18650 battery health?
For optimal performance and safety, test key parameters every couple of months. More frequent quarterly checks though are advisable for batteries in demanding high drain or extreme temperature applications.
What are acceptable 18650 voltage and internal resistance values?
- No load voltage – 3.6V to 4.2V
- Loaded voltage – Under 10% drop from no load
- Internal resistance – Sub 100 milliohm for high drain cells
When should 18650 batteries be replaced?
Capacities dropping below 80% of original, internal resistance exceeding 150% of initial readings or no loa voltage under 3.2V are all signs it’s time to retire 18650 cells.
Can I check 18650 capacity with a multimeter?
No, while multimeters assess voltage and resistance reliably, determining true battery capacity requires specialized equipment that performs controlled discharge cycles.
The Last Word
Equipped with just a trusty mutlimeter, we can test key 18650 lithium-ion health parameters – voltage, resistance and continuity. Comparing them versus cell history provides insights into current condition and lifetime.
But don’t take testing lightly or ignore deviations. Always err on the side of caution as lithium-ion safety is no joke. Prevention of catastrophic failures or reduced performance hinges on prudent testing.
So grab those multimeters and get a handle on your 18650 fleet’s true well-being! Consistent checks coupled with timely corrective actions keep batteries serving reliably for years.
How do you test and ensure 18650 battery health? Have you faced abnormal readings or deterioration issues? I’d love to hear your experiences in the comments!