


Knowing the true capacity of 18650 lithium-ion battery cells is crucial whether you are buying new cells or salvaging and testing used ones. But how do you accurately measure the capacity of cylindrical 18650 battery cells?
In this comprehensive guide, as a professional 18650 battery packs manufacturer, I’ll outline several methods to test 18650 battery capacity at home, along with the necessary tools and calculations. By the end, you’ll know exactly how to check and verify 18650 cell capacity.
Why Battery Capacity Matters
First, let’s quickly cover why having batteries with the correct, rated capacity is so important for any project.
The capacity ratings for Li-ion cells aren’t just for show – they give real-world estimates for how much energy the cell can deliver before needing to be recharged. For example, a cell rated at 3000mAh should be able to supply a current of 3000mA for one hour before dropping to the minimum safe voltage.
If your application expects 3000mAh but the cells actually deliver less, you’ll run into problems. The device will unexpectedly shut down when the cells become depleted or the equipment may not even turn on at all.
On the flip side, if the cells have significantly higher capacity than stated, they can be charged beyond their safe voltage or current limits, leading to damage or even dangerous failures.
So in short – verifying capacity gives you confidence that the cells will power your project as intended. Fudging these ratings for sales purposes is unfortunately common, making testing all the more important.
Now let’s get into the methods and tools to accurately measure 18650 capacity.
How to Check 18650 Battery Capacity
Using a Battery Capacity Tester
The most accurate and straightforward route for testing 18650 capacity is to use a dedicated battery capacity tester or analyzer. These devices automate the process by applying a load to the cell and tracking current/voltage over time to produce a capacity measurement.
Benefits:
- Extremely accurate capacity measurements
- Plots voltage curve over time
- Built-in safety features
- Some testers support multiple chemistries (Li-ion, NiMH, lead acid, etc.)
Drawbacks:
- Capacity testers cost more than basic chargers
- Limited to testing one cell at a time in most consumer-grade testers
Most 18650 capacity testers in the $100 range should suit smaller-scale testing needs. For example, the SkyRC MC3000 can test capacity at up to 2A discharge currents with 18650 adapter trays available.
Overall for the best accuracy per cell, a purpose-built 18650 capacity tester is the way to go.
Using a Constant Current Load
For DIYers on a budget, using a basic electronic load paired with a multimeter offers reasonably accurate capacity measurements too.
You’ll manually set the load’s current draw and then monitor the cell’s voltage over time until it drops to the cut-off voltage. Combined with the fixed load current, you can calculate overall capacity.
Benefits:
- Very simple and affordable
- Allows higher discharge currents than most battery testers
Drawbacks:
- More manual calculation required
- Discharge process must be monitored for best results
- Only measures one cell at once
To illustrate the process…
Let’s say we have a benchtop programmable load like the Korad KA3005P. After securing the 18650 cell in a holder, follow these general steps:
- Set load to a 0.5C constant current discharge. For a 3000mAh cell, that would mean setting a 1500mA load.
- Start discharge process and monitor cell voltage over time. Record starting voltage.
- Stop process when voltage hits cut-off (around 2.5V). Record end time and voltage.
- Enter parameters into capacity formula:
Capacity (mAh) = Discharge Current (A) x Time (hours)
So for the above example:
Capacity = 1.5A x 2 hours = 3000mAh
This simplified example yields very usable capacity estimates. Just be sure to fine-tune the discharge current, cut-off voltage, and other parameters to suit your particular cell type.
Following this process with an adjustable load allows18650 cell capacity testing for a relatively small cash outlay.
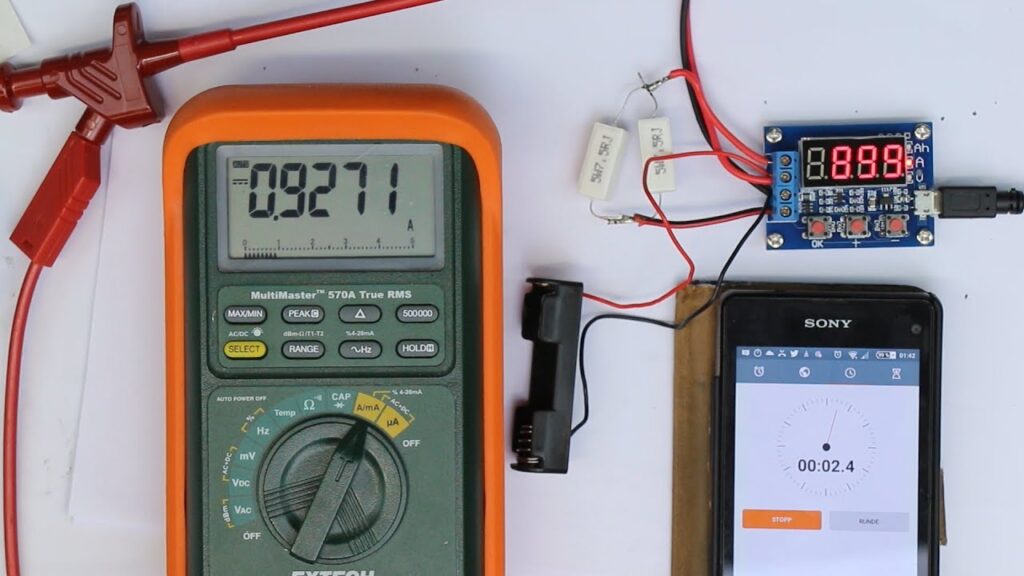
Using a Multimeter and Resistor
If you don’t have access to an electronic load, the same basic capacity testing procedure can be followed using just a multimeter and power resistor.
Benefits:
- Extremely simple and affordable
Drawbacks:
- Very approximate capacity estimates
- Discharge process must be monitored continually
- Resistor power dissipation must be considered
Here is a simplified procedure:
- Select an appropriate power resistor e.g 10Ω 5W
- Connect multimeter directly across the resistor to measure current flow
- Securely connect resistor across 18650 cell. Double check polarity!
- Monitor cell voltage periodically. Record starting voltage.
- When voltage nears 2.5V, note end time and voltage. Remove resistor.
- Calculate:
Capacity (mAh) = Average Current (A) x Time (hours)
Depending on the value of the sense resistor, this approach offers useable approximations given some trial and error. But the figures obtained won’t be as accurate as dedicated test methods.
Be sure to select a discharge resistor rated for sufficient wattage to avoid overheating. And carefully check connections to prevent shorts.
With practice, the two multimeter strategies here work in a pinch for testing loose 18650 cells when lacking proper capacity testing equipment.
Using Manufacturer Datasheets
When buying brand new, unused Li-ion cells, the easiest capacity check is…no check required at all!
Simply refer to the manufacturer’s datasheet for the capacity rating. Major cell producers extensively test capacity during production, so this figure can generally be trusted for quality cells.
Of course, verifying a small sample is still a good idea to confirm the production batch performs as expected. But datasheet figures eliminate the need to measure every single cell.
So for new cells from reputable suppliers, cross check stated ratings against online datasheets when available.
Step-by-Step Process for Testing 18650 Battery Capacity
While the fundamental process is straightforward, properly testing cylindrical cells does require some care and planning.
Follow this step-by-step process when measuring 18650 capacity:
Step 1: Visual Inspection
Before connecting any test equipment, closely inspect each 18650 cell for:
- Dents, cracks, leaks or corrosion
- Damaged positive terminal insulator ring
- Signs of internal damage e.g. rust-colored streaks
Any cells with noticeable physical defects should be set aside and properly disposed of.
Step 2: Record Starting Voltage
Use a digital multimeter (DMM) to measure and record the starting “rest” voltage of each cell. This gives a baseline for later comparison.
Step 3: Fully Charge Cells
Fully charge each cell to 4.2V using an 18650 Li-ion charger. This eliminates variability from unknown starting charges.
Select charging current based on cell specifications or use 1C (capacity rating in mA) current.
Step 4: Secure Cell and Connect Equipment
With a capacity tester, simply insert the cell securely in the appropriate slot, ensuring proper polarity.
For DIY discharge methods, securely mount the cell in a suitable holder before attaching test leads. Check polarity again before proceeding!
Step 5: Discharge and Record Data
For standalone capacity testers, follow manufacturer directions to initiate discharge cycle. For constant load or resistor arrangements, begin discharge and monitor voltage over time.
Record ending voltage and elapsed time when voltage nears 2.5V cut-off.
Step 6: Repeat and Compare
Ideally repeat the discharge process for each cell at least twice more. Compare results to check for consistency and notice any outlier readings.
Significant differences could indicate faulty or worn out cells.
Step 7: Calculate Battery Capacity
Plug measured parameters into the capacity formula to convert discharge current and times into capacity ratings:
Capacity (mAh) = Discharge Current (A) x Time (hours)
Compare your measured capacity values to stated ratings to determine actual cell performance.
Key Battery Capacity Testing Takeaways
Getting accurate, real-world capacity measurements from 18650 cells is vital for any project using lithium-ion batteries.
While specialty testers make the process easy, the constant current load and even resistor methods work reasonably well too.
No matter the equipment used, follow best practices like:
- Thorough visual inspection before testing
- Comparing measured values to datasheets when available
- Repeating tests multiple times for consistency
Learning this vital first step helps ensure your lithium-ion cells meet capacity expectations down the line.
Now you know exactly how to check 18650 battery capacity!
What methods have you used to test cell capacity? I’d love to hear your tips and tricks in the comments below!
Frequently Asked Questions About 18650 Battery Capacity Testing
What equipment do I need to measure 18650 battery capacity?
Accurately testing 18650 capacity requires either a dedicated 18650 battery tester or meter, a basic programmable load and multimeters, or at a minimum a fixed power resistor and multimeter. In every scenario, a DMM to monitor voltage is essential.
How accurate are multimeter and resistor test methods?
If properly executed, DIY resistance-based methods can provide completely usable capacity estimates good to about 10%. But the nature of changing voltage under load means precision suffers. The best route for consistently accurate results is an automated capacity tester.
What 18650 discharge current should I use?
Standard rating conditions for most quality Li-ion cells is 0.2C (a discharge rate equal to 1/5 the capacity rating). But most cells support rates from 0.5C up to their full 1C rating. Using 0.5C works well for typical testing needs. Consult individual cell datasheets for guidance.
How do I calculate battery capacity from discharge?
Capacity ratings in milliampere-hours come from multiplying the fixed discharge current by the length of time (in hours) the cell can sustain that current draw before hitting minimum voltage.
What cut-off voltage is safe for Li-ion discharge testing?
Maximum cell discharge for testing purposes should end no lower than 2.5V for unprotected cells. Battery protection circuits and advanced capacity testers will stop discharge well above harmful lower voltage limits, improving longevity.
What conditions must be met for valid capacity testing?
Key parameters like starting voltage, charge level, discharge current, cut-off voltage, and ambient temperature should be carefully noted and controlled between tests. Only compare results from multiple cells with identical test circumstances for fairness.
How often should 18650 batteries be capacity tested?
General best practice is to baseline test new cells, then annually as cells age. Signs like unexpectedly short runtimes indicate damaged cells and call for immediate capacity checks to find any problem specimens.